Những kiến thức cơ bản về da PU bạn cần phải biết

Tiêu đề nội dung
Da PU, trong đó PU là viết tắt của cụm từ Polyurethane, là chất liệu làm từ da split (phần xơ của phần da đã được tách ra để làm da Top grain) được tráng một lớp Polyurethane và dập nổi trên bề mặt. Đây là một trong những loại chất liệu rất phổ biến hiện nay được dùng để thay thế cho chất liệu da thật trong sản xuất đồ may mặc, bởi vì đây là loại da có giá thành thấp, lại trông giống da thật.
Tìm hiểu tấn tần tật các kiến thức về da PU?
1. Da PU là gì ?
Da PU, trong đó PU là viết tắt của cụm từ Polyurethane, là chất liệu làm từ da split (phần xơ của phần da đã được tách ra để làm da Top grain) được tráng một lớp Polyurethane và dập nổi trên bề mặt. Đây là một trong những loại chất liệu rất phổ biến hiện nay được dùng để thay thế cho chất liệu da thật trong sản xuất đồ may mặc, bởi vì đây là loại da có giá thành thấp, lại trông giống da thật.
2. Lịch sử ra đời của chất liệu giả da
Da PU là một loại chất liệu đã có mặt từ rất lâu đời, nhưng được phổ biến và thịnh hành trong thời gian gần đây.
Vào đầu thế kỷ 15, chất liệu vải parasol được sử dụng trong sản xuất sợi vải để lấy chất sáp sản phẩm giả da đầu tiên đã ra đời từ đây. Theo thời gian, lấy ý tưởng từ loại vải này và kết hợp với một số chất liệu khác, loại vải này đã được cải tiến bền chắc hơn và đa năng hơn.
Cho đến ngày nay, chất liệu giả da phổ biến làm từ Polyme chính được chia làm 2 loại là da PVC và PU. Da PVC tên gọi đầy đủ (Polyvinyl Chlorid) xuất hiện trước da P.U được tạo ra bằng cách tách phân tử Hydro trong nhóm Vinyl và thay thế bằng nhóm Chlorid. Sau đó, nó được kết hợp với một số chất hóa học khác để tạo ra chất liệu rất bền. Còn da PU là simili được phủ lên một lớp nhựa Polyurethane (PU).

3. Tại sao da PU lại phổ biến
Mặc dù là vậy nhưng chất liệu PU cũng được các thợ may và nhà thiết kế ưu ái nhiều hơn PVC trong việc tạo mẫu bởi ưu điểm mà nó có được như có cảm giác mềm mại, chịu ma sát tốt. Trong khi da PVC không thực sự giống thật và thậm chí còn dính vào nhau trong điều kiện thời tiết ấm, không thấm nước.
Ngoài ra, xét về khía cạnh môi trường và sức khỏe, chất liệu PVC còn thải ra chất dioxin gây nguy hiểm khi bị cháy và sử dụng chất dẻo cực độc hại. Chất da PVC đã không còn được sử dụng nhiều như những năm 60, 70.
Tuy nhiên, với chất da PU được sử dụng phổ biến ngày nay lại chống bụi bẩn nhiều hơn và rất dễ làm sạch. Hơn nữa nó cũng bay màu chậm hơn kể cả dưới ánh sáng trực tiếp. Đặc biệt, chất PU còn thải ra ít chất độc hại ra môi trường hơn chất PVC.
Một trong những nguyên nhân chủ yếu đó là sự phản đối từ các nhà bảo tồn động vật cũng như những người yêu quý động vật trước việc bắn giết lấy da động vật sản xuất thành vải vóc, trang sức làm đẹp cho con người. Chính vì lý do này mà chất liệu giả da, hay chất liệu da do con người tự tạo nên lại được sử dụng phổ biến hơn khi chúng vừa đáp ứng được nhu cầu may mặc lại vừa đảm bảo sự an toàn cho các loài động vật.
4. Ưu điểm và nhược điểm của da PU?
Ưu điểm
- Có giá thành rẻ hơn da thật chỉ bằng ½ da thật
- Đáp ứng tốt và đảm bảo được các tiêu chí mềm, bền, mịn và đẹp.
- Dễ dàng lau chùi nó khi bị dính vết bẩn.
- Chống thấm nước rất tốt
- Sử dụng da PU góp phần bảo vệ động vật.
- Màu sắc rất đa dạng.
Nhược điểm
- Tuổi thọ thấp hơn da thật.
- Độ bền của nó thấp và kém hơn da thật.
- Dễ bị bong tróc, mốc và bị nổ nếu như bạn bảo quản không tốt.
- Do PU là chất nhựa tổng hợp nhân tạo nên khó phân hủy và rất dễ bắt lửa.
- Khi sản xuất da PU dễ gây ô nhiễm môi trường do la chất liệu nhân tạo.
Những ứng dụng của da PU trong sản xuất
Chính vì nó có độ thẩm mỹ không kém gì da thật và giá thành phù hợp nên được ứng dụng rất nhiều trong các ngành sản xuất.
1. Ứng dụng da PU trong ngành sản xuất thời trang
Với nhu cầu các sản phẩm thời trang cao cấp ngày càng gia tăng cũng như rất hạn chế về chất liệu da thật, các nhà sản xuất đã sử dụng da PU cao cấp để ứng dụng sản xuất cho các sản phẩm: Túi xách, ví da, thắt lưng, quần áo, cặp sách, balo…
Không những bền đẹp, mềm mại, đa dạng màu sắc mà nó còn có giá thành tương đối rẻ, chỉ bằng 1/3 -> 1/4 so với da thật. Thế nên các bạn đều có thể thấy những chiếc túi xách, ví da, balo làm từ da PU chỉ có giá chỉ vài trăm nghìn đồng. Và thủ phủ của ngành sản xuất đồ da PU có thể kể đến chính là Trung Quốc, nơi mà các nhà buôn vẫn thường Oder hàng về Việt Nam để bán.
2. Ứng dụng da PU trong sản xuất giày
Với điều kiện khí hậu tự nhiên của Việt Nam là nóng ẩm, mưa nhiều, phương tiện di chuyển vẫn chủ yếu bằng xe máy, chính vì thế mà da PU lại một lần nữa được các nhà sản xuất giày dép đưa vào làm nguồn nguyên liệu chính. Những đôi giày từ da PU có bề mặt sáng bóng, không thấm nước, mềm mại mà giá cũng chỉ từ vài trăm nghìn đồng
Không chỉ có vậy, những đôi giày từ da PU cao cấp không bị mùi hôi, mùi khó chịu như giày da PVC thông thường. Đây chính là một trong những lý do mà da PU được sử dụng chính trong ngành giày dép
3. Ứng dụng da PU trong các sản phẩm đồ nội thất
Với những ưu điểm là bề mặt da sáng bóng, không thấm hút mồ hôi, nước, bề mặt da có màu sắc phong phú, dễ lau chùi nên da PU là nguyên liệu duy nhất có thể đáp ứng được những yêu cầu khắt khe của ngành này. Các sản phẩm như; ghế oto, ghế Salon, các loại nội thất cần phủ bề mặt hầu hết đều sử dụng da PU.
4. Ứng dụng cho các ngành sản xuất khác
Ngoài các ngành chính kể trên, da PU còn dùng cho sản xuất bìa bọc sổ tay, sách, vỏ hộp các đồ cao cấp, đệm ghế….
Hướng dẫn cách làm sạch da PU
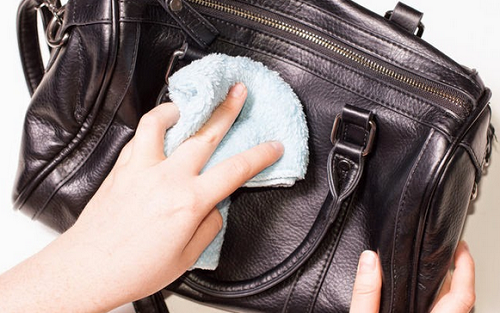
Sở hữu chiếc áo khoác làm từ chất liệu da, nhiều người luôn băn khoăn về việc làm thế nào để làm sạch chúng mà không vô tình làm hỏng món đồ của mình. Vậy thì ngay bây giờ đừng chần chừ “giắt túi” những mẹo làm sạch đồ giả da với Ngọc Quang nhé!
1. Các cách làm sạch cơ bản
Một trong những sai lầm lớn nhất mà nhiều người mắc phải đó chính là mang áo khoác da PU đến tiệm giặt khô là hơi. Bởi vì áo khoác da PU làm từ chất dẻo và chất dẻo đặc biệt dễ nóng chảy dưới nhiệt độ cao nên chắc chắn việc giặt khô là hơi sẽ làm hỏng chiếc áo của bạn.
Để biết cách làm sạch phù hợp cho áo khoác da PU mà bạn có phụ thuộc vào mức độ bẩn của áo khoác.
Dùng miếng vải mềm thấm nước
Đây là cách làm sạch qua với những chiếc áo khoác bị bám bụi hay chất bẩn dễ tẩy rửa.
Chuẩn bị:
- 1 miếng vải sợi tổng hợp, nước
Các bước thực hiện:
- Bước 1 : Nhúng miếng vải vào nước và vắt khô.
- Bước 2 : Nhẹ nhàng lau sạch áo khoác.
- Bước 3 : Treo lên mắc hoặc phơi lên cho khô.
Giặt tay
Với những chất bẩn không thể đơn giản làm sạch bằng việc lau bằng nước như trên thì bạn cần áp dụng cách giặt tay cho áo khoác.
Chuẩn bị:
Nước ấm; Nước giặt, chậu nhỏ và 01 miếng vải sạch.
Cách làm:
- Bước 1 : Hòa hỗn hợp nước ấm và nước giặt trong 1 chậu nhỏ.
- Bước 2 : Dùng miếng vải nhúng vào hỗn hợp và lau áo khoác.
- Bước 3 : Treo lên mắc hoặc phơi lên cho khô.
Giặt máy
Trước khi cho áo khoác da PU vào giặt máy, bạn cần kiểm tra cẩn thận nhãn mác. Nếu nhãn mác nói rằng bạn chỉ được giặt tay (handwash only) thì phải rất cẩn thận. Nếu không, bạn có thể chọn mức quay máy giặt nhẹ để giặt áo khoác da PU.
2. Cách làm sạch vết bẩn ố
Một số vết bẩn nếu không được loại bỏ ngay sẽ để lại vết bẩn ố lên áo của bạn. Đặc biệt là với áo khoác da PU, chất bẩn rất nhanh chóng bám vào chất liệu áo. Trong trường hợp vết bẩn do đồ uống, hãy sử dụng chất xịt đa năng để làm sạch. Còn đối với trường hợp vết bẩn do mực gây ra, bạn có thể sử dụng bình xịt tóc để loại bỏ mực khỏi chất liệu và nhẹ nhàng lau đi.
3. Cách loại bỏ mùi hôi
Cũng giống như các loại áo quần khác, áo khoác da PU cũng có thể bị bám mùi như mùi thuốc lá, mùi nước hoa,…Hãy thử những cách sau để loại bỏ mùi hôi trên áo khoác da PU
- Cách 1: Phơi áo khoác ra chỗ râm mát từ 3 đến 5 tiếng. (Không khí có thể giúp áo khoác bạn loại bỏ được phần nào mùi
- Cách 2: Với áo khoác bị dính mùi khó chịu hơn. Bạn bọc áo khoác trong túi nilon bóng kính và cho vào miếng làm mềm vải rồi để như vậy trong vài ngày
Mách bạn cách phân biệt da PU và da thật
Da thật (da tự nhiên) hay còn gọi là da thuộc, thường được ghi real leather, genuine leather, genuine leather (da bò), 100% leather trên sản phẩm… Da bò được dùng trong các dòng sản phẩm thời trang , nội thất cao cấp. Vì vậy, da thật được nhiều người tin dùng và đặc biệt quan tâm khi mua sắm các sản phẩm bằng da.
Thoạt nhìn bạn có thể sẽ không phân biệt được ngay da PU và da thật bởi nó rất giống nhau. Để tránh trường hợp mua phải hàng da PU, da giả kém chất lượng, Ngọc Quang gợi ý một số cách phân biệt đơn giản như sau:
1. Kiểm tra bằng mắt
Kiểm tra bằng mắt là công đoạn dễ dàng nhất của người tiêu dùng khi mua sản phẩm. Những sản phẩm được làm bằng da thật thường có lỗ chân lông nếu bạn nhìn kỹ trong khi những loại sản phẩm được làm bằng simili thì thường láng bóng, không có lỗ chân lông. Bởi cho dù đã xử lý và in vân lên sản phẩm nhưng lỗ chân lông không thể làm giả được. Tuy nhiên, với những sản phẩm da cao cấp, bạn khó lòng có thể phát hiện được điều này bởi chúng được xử lý và thuộc da quá tốt, hầu như đã loại bỏ hoàn toàn lỗ chân lông trên bề mặt da.
2. Ngửi sản phẩm
Khi ngửi sản phẩm da thật, bạn sẽ thấy có mùi ngai ngái và hơi hoi của da động vật. Trong khi những sản phẩm được làm bằng da giả thường có mùi hóa chất hoặc mùi nhựa đặc trưng.
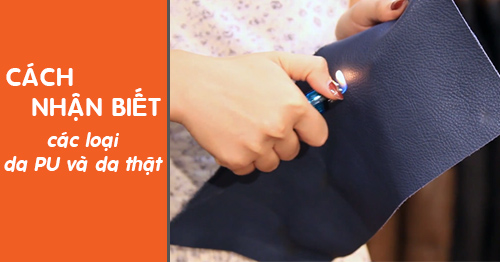
3. Hơ lửa hoặc đốt
Với những sản phẩm bằng da giả, khi bị đốt chúng thường có mùi da bị cháy xém có mùi khét, tóc cháy trong khi những sản phẩm được làm bằng da giả, chúng thường bị vón cục khi cháy.
4. Làm ướt sản phẩm
Khi nhỏ một vài giọt nước vào da thật, sau một vài phút, chỗ nước đó sẽ bị lan rộng và thấm vào da do da thật luôn hấp thụ độ ẩm trong khi da giả do không thấm nước nên nước thường trượt khỏi bề mặt.
5. Ấn vào sản phẩm
Một cách giúp bạn có thể cơ bản phân biệt được da thật và da giả đó là ấn vào sản phẩm. Với những sản phẩm da thật, khi ấn vào chúng thường lõm xuống xung quanh chỗ ngón tay trong khi những sản phẩm da giả sẽ chẳng thể có được độ đàn hồi như thế.
Với 5 cách phân biệt da thật và da công nghiệp, da PU cơ bản trên đây, chắc chắn bạn sẽ biết cách chọn cho mình một sản phẩm ví da, thắt lưng da, hay túi da ưng ý mà không lo việc mua phải hàng da giả.
CÔNG TY TNHH TM DV NGỌC QUANG – Chuyên phân phối các sản phẩm da thật cao cấp: thắt lưng nam, ví da nam, ví passport da thật…
Mua các sản phẩm da thật do Ngọc Quang cung cấp sẽ mang đến sự hài lòng tuyệt đối cho bạn. Các sản phẩm của Ngọc Quang đều do các tổ chức kiểm định quốc tế hàng đầu và theo tiêu chuẩn reach để đảm bảo cung cấp cho thị trường những loại da không những bền, đẹp, an toàn tuyệt đối với con người mà còn cả với môi trường sinh thái. Mua hàng tại Ngọc Quang được bảo hành 12 tháng và được bảo trì sản phẩm trọn đời.
- Địa chỉ: 2N Cư Xá Phú Lâm D, Phường 10, Quận 6, Tp.HCM
- Hotline: 098-300-9285 / 090-267-1099
- Email: quang.nguyen@thatlungnam.com.vn
- Website: https://vietnamleather.com
Các tìm kiếm liên quan đến da pu
- báo giá da pu
- da pu bị tróc
- giày da pu có tốt không
- da pu giá bao nhiêu
- ví da pu
- mua da pu
- mua da pu o dau
- bảo quản giày da pu