Guide To Leathercraft – Maze Leather – Nội dung cập nhật 2024
Tiêu đề nội dung
Tạp chí công nghệ da, sản phẩm thuộc da, chia sẻ kiến thức chuyên ngành da thuộc, cập nhật các xu hướng thời trang và đặc biệt giúp bạn lựa chọn đồ da (túi da, ví da, thắt lưng da, cặp da, giày da,…) và công nghệ sản xuất da thuộc tiên tiến.
3+ Guide To Leathercraft – Maze Leather cập nhật kiến thức mới nhất 2024

Messenger bag I made. Image by Emily Medlock
A guide to Leathercraft will cover everything there is to know about getting started with the art. Because that’s exactly what leatherworking is – an art. Any art takes time to master; even then, there’s always something new to learn or improve.
I first got into leatherworking a few years ago when I was looking for a new hobby. I’ve always been fascinated by it but never had the time or resources to pursue it as an art. Deciding to take the plunge was a wonderful decision.
What to Know About Leathercraft

Pocket, zipper, and hardware on a project. Image by Emily Medlock
Leathercrafting is not something you can learn overnight. But you can learn to finish a leather project in just one afternoon. If you start small and build on your knowledge, you can become an expert leatherworker.
Whenever you begin leatherworking, know that you will make mistakes – I sure have. The longer I tune my skills, the fewer mistakes I make. However, there will never be a time when you are perfect. So don’t believe anyone who tells you they are.
What happens when you do learn more and become an expert is that you know how to prevent some of these mistakes and grow from them. You may even learn how to overcome mistakes you’ve already made.
For example, if you cut too much off one side of the leather, you may have a good idea of what to use that cut piece for rather than getting discouraged. Or if a dye job goes bad, you may decide to “paint it black” and find it turns out better than the original.
Also, it’s important to know that you don’t need to invest hundreds of dollars into leatherworking. You can start slow with pocket change by buying a few simple tools and go from there.
History of Leathercraft

Sunflower I made for Mother’s Day, Image by Emily Medlock
Leatherworking has been around since at least 5000 BC, though it’s more likely that it has been a craft for over 400,000 years. The concept came from a no-waste mindset. Hunters would eat meat from an animal but realized they couldn’t eat the hide. But they didn’t want to let it go to waste either.
At this time, and for thousands of years, it wasn’t a matter of fashion or hobbies but of practicality. There is evidence of shelters and clothing made of leather that dates back to the Stone Age.
In 2010, a pair of leather shoes in Armenia was found in-tact that date back to 2500 BC. This is proof that leather products can last for thousands of years. That’s a warrant that no one would believe without evidence.
By the time the Greeks and Romans in the 8th century got ahold of leather, it was being used as more than clothing. It was finally a fashion statement used for everything from shields to handbags to saddles.
Not much has changed since then when it comes to leathercrafting. We have much better tools and new tanning methods, but the craft is the same. Though controversy is tied to it, it’s safe to say that the masses admire it and its sensible history.
Leathercrafting Process

So many dyes leaked when not stored properly. Image by Emily Medlock
The leathercrafting process varies depending on what you are making. You may tool, burn, or dye your leather, though none of this is necessary. But generally, there is a certain order in which you do the steps for a leatherworking project.
1. Mark Leather or Set the Pattern (if using one)
I suggest using a pattern most of the time. You can get free patterns online or buy nice ones with customer support available on Etsy. If you don’t use a pattern, you can make your own. This will always be the first step.
Once you cut your pattern, you should tape it to the leather. Make sure to tape it well so the pattern doesn’t shift. I have used masking tape, packing tape (a huge mistake), electrical tape, and more. It’s nearly impossible to find something that sticks well but doesn’t leave any marks or residue. So don’t leave a thick border on the leather to prevent serious damage.
2. Punch Holes
The next step is to punch any holes that will have buttons or other hardware and then use your chisel to make stitch holes. Stitch holes are necessary for stitching leather because your needle won’t puncture it cleanly.
3. Cut the Leather
Cutting the leather is one of my favorite parts because it goes so smoothly if you have a sharp knife. Keep one hand on the leather/pattern to keep it steady, and keep your knife hand steady and even.
4. Wet Leather
This is almost always the next step. You need to wet your leather for the next two steps. When you do, you can dip it, brush it, or spray it. I use a spray bottle for an even mist that doesn’t spill. Put plenty of water on the leather, then wipe off the excess.
5. Tool (optional)
While the leather is damp, tool and carve it. You can also bevel now, but depending on the type of leather, it’s best to bevel the edges when it is completely dry. But, of course, beveling is optional.
6. Dye
Assure the leather is damp again; it’s time to dye it. Some people don’t dye their leather and either apply a finish or buy pre-dyed leather. I prefer the look of hand-dyed leather. It also allows me to customize the look and try new dying patterns.
Always dye when the leather is damp, and use something that will give you an even layer of dye. I use daubers for small projects and cloth for larger ones. I have seen people dip the leather, but this isn’t my style; I prefer a lighter touch.
7. Apply Hardware and “Finish”
After the dye dries, you can place any hardware you have. You usually need special tools that come with the hardware to set them. This is also when you apply a finish, which I do right before placing the hardware. You can use something simple like carnauba creme or, my favorite, Resolene.
8. Stitch
After the leather finish is dry, start stitching. This is fairly straightforward since you have stitch holes. Sometimes I go for a saddle stitch, and other times I keep it simple. Though I almost always use wax-covered thread.
9. Apply Last Finish
This is another optional step, but I always review my piece and ensure I don’t miss anything. If there are any scuff marks or the piece needs to be buffed, I do this now before applying one last layer of Resolene.
Types of Leather

Undyed veg-tanned, non-chrome-tanned “genuine” leather from scrap bag, and pre-dyed chrome-tanned. Image by Emily Medlock
There are many types of leather and many more ways to categorize these types. This was one of the most confusing parts of leatherworking when I first started. So I spent hours reading articles, watching videos, and finally testing most of them out firsthand.
Tanning Method
- Chrome Tan – most real leather products you buy in the store are chrome-tanned. This process uses chromium to tan leather. It keeps the leather soft and pliable and takes color extremely well.
- Vegetable Tan – this leather is a favorite in the leather crafting community. It’s a natural method using animal oils. It’s easier to tool, looks natural, and ages wonderfully.
- Chrome-Free Tan – this is a rare method in the small business and crafting community. It is manufactured without chromium though it has no specific material used for tanning.
Leather Grain/Grade
- Full Grain – the best type of leather that has not been shaved or split. It’s the most durable, has the most imperfections, and is the most expensive because it has been relatively untouched.
- Top Grain -this type of leather is corrected but still natural. Nubuck is top-grain leather that has been sanded down to feel soft and smooth but no longer easy to tool.
- Split Grain – suede falls into this category of split leather made with the center layer of the hide. The top layer of the grain is split away. So this is the other half of the top grain leather, the part that is split away.
- Bonded Leather – the type of leather that makes leatherworkers cringe. Bonded leather is low-grade leather that is made from scraps of leather that are adhered together and embossed with polyurethane. It’s nearly impossible to work with and falls apart over time.
- Genuine Leather – this term is thrown around so much that it hardly has a set definition. It usually has to be “real” leather, but it can be any cut, any grain, and any animal. It can even mean that there is a hint of leather mixed with 99% faux leather.
Leather Cut
- Back – average 40 sqft for full-back – best overall quality mixing durability, stretch, and smoothness because it contains the bend and part of the shoulders.
- Shoulders – average 15 sqft for both shoulders – usually great quality, thin, and stretchy but has natural blemishes.
- Side – average 22 sqft for one side – contains part of the back, belly, and shoulder. The best option to try them all at a good price.
- Bend – average 25 sqft for double bend – this is similar to the back but without the shoulders. It is the thickest part of the hide, making it the least stretchy.
- Belly – average 6 sqft – the thinnest and loosest part that is sometimes cut off and used as scraps.
- Whole Hide – average 50 sqft -buying this means you get all of the above, with the rare exception of the belly being trimmed off.
Leather Weight (Thickness)

Examples of leather thickness, notice the very slight differences in 4 to 7 oz varieties. Image by Emily Medlock
- 1-3 oz – less than 1 to 1.2 mm – wallets, shoes, and linings. Difficult to work with without tearing and nearly impossible to tool but is soft and perfect for details.
- 3-4 oz – 1.2 to 1.6 mm – bags, book covers, and furniture. Quite universal that can be tooled but is still quite pliable – this is my favorite for small to medium projects.
- 5-6 oz – 2 to 2.4 mm – knife sheathes, keychains, and stiff hats. The most universal in my book that I use for projects requiring durable leather that can stand independently.
- 6-9 oz – 2.4 to 3.6 mm– boots, thick belts, sword sheathes, and collars. This is great for cosplay armor and other projects that you want to be extremely durable and stand as well as thin wood.
- 10 oz or more – 4 mm or more – shoe soles, saddles, some holsters. Leather thicker than this is rare, and patterns will hardly ever require it.
Leather Source
- Cowhide – by far the most common, cheapest, and is what is referred to when the term “leather” is used without specifications.
- Sheephide – the softest leather option, lightweight and smooth.
- Goatskin – pebbled and soft, yet just as durable as cowhide.
- Deerskin – similar to cowhide but softer and what footballs are historically made from.
- Bison/Buffalo – thicker than cowhide but has a pebbled grain.
- Exotic Options – like snake, crocodile, ostrich, and pig. These are rare, difficult to work with, and easy to recognize.
Techniques to Decorate Leather

Simple leather carving. Image by Emily Medlock
There’s not much that is more satisfying than making leather projects more interesting. You can do this by decorating the leather at the proper stage using one of these special leather techniques.
Leather Burning
This is one of my favorite leather techniques. It involves using a leather-burning tool to burn designs into the leather. You must do so on undyed leather with a pyrography tool, the same tool used for wood burning.
Leatherburning can be difficult depending on the nib and leather you use. But in the end, the technique is similar to learning calligraphy. You must learn the proper temperatures, pressure, angle, and more.
Leather Carving
Leather carving comes in many layers. You can learn the simplest forms of carving to create something unique. But as you learn more, you can create so much depth that people will no longer recognize your project as leather – in a good way.
Carving is always done with undyed, damp leather. If you do not wet the leather, the carving will turn out messy as it catches on the leather grains. The tools must also be sharp.
Leather Stamping
Stamping is a super easy way to add personality to your leather project that also needs to be done on damp leather. It involves using pre-made stamps to make tiny designs in leather. You can use flowers, butterflies, and letters to keep it simple.
Or you can get creative with dragon scales, basket weaves, and border patterns. If done right, this can look carved but is much easier. You must be precise when using stamps so you don’t overlap patterns.
Dye Patterns

Simple dying pattern example. Image by Emily Medlock
Although the classic way to dye leather is a simple one-color, no-pattern method, it’s not the only way. You can make tie-dye patterns, do an ombre effect, or a classic vignette.
I love working with dye patterns because it’s easy, and if I mess up, I can dye the whole thing a darker color. Just be careful with how many layers of dye you add because it will get darker each time and you won’t be able to see the details of burning, carving, or dye pattern.
Wet Molding
Wet molding is a specific method where you soak the leather so that it is pliable enough to mold. This is perfect for shaping boxes, shoes, and such. But it can also be used to add details.
I did this when I made a sunflower and wanted the petals to fold and twist naturally. There’s a lot of room for experimentation here that I don’t believe is used enough.
Painting Leather
Painting leather is uncommon because dyes look more natural. But you can even paint dyed leather after it dries. Any acrylic paints work on leather, but they will fade or rub off over time, whereas dye will not.
However, paint won’t bleed as dye does on leather, so it’s much easier to use a brush to apply the paint in detail without splotching over the entire project. I love to use gold paint on the edges of my projects.
Fake Stitching
Fake stitching is a common way to add another dynamic to a leather project. You can do so by adding stitch lines, borders, or designs in the top layer of leather. Do this before you stitch any pieces together.
Lasercutting
This is an initially expensive way to decorate leather and make it look factory-made. You can use specific patterns for your shop for a super quick way to process with little to no mistakes.
The only problem with lasercutting is that it no longer looks handmade. Some people want a perfect image on their leather that has amazing fine details. But others (like me) want it to look natural and well-loved, even if that means giving up immaculacy.
Products You Need for Leatherworking

Knife and anvil. Image by Emily Medlock
I’m going to keep this list short because there are very few tools you need to start leatherworking. When I started, I was under the assumption that I couldn’t finish a project until I bought this list of over a dozen tools, but that wasn’t the case.
So below, I will list the bare minimum for what you need to get started. This will allow you to begin leatherworking for under $20 without counting the cost of leather. That’s what I suggest doing, in case you don’t enjoy the craft.
Leather
Leather is the most important product for leathercrafting. While you can buy fake or bonded leather, I suggest getting real veg-tanned or chrome-tanned leather for 99% of projects. Whether it’s dyed or not is optional.
Cutting Tool
A simple cutting tool is all you need to get started. A utility knife or exacto knife is ideal. But any knife you can safely cut straight and curved lines with will work. Always test your knife on a scrap piece first.
Thread and Needle
Leather thread and leather needles are necessary for stitching leather. Don’t get standard needles and thread because they will break. But you can use almost anything that says “heavy-duty” on most leathers under 6oz.
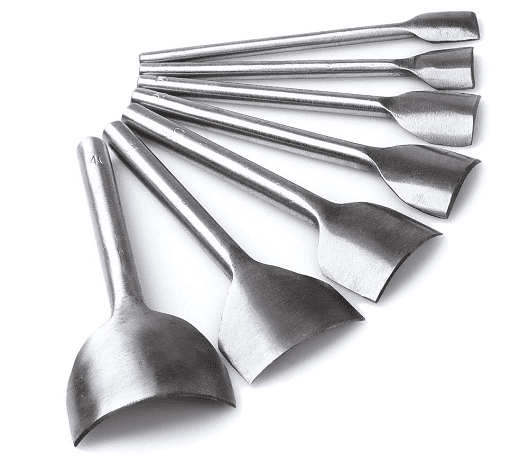
Hole Punch/Chisel
If you’re going to stitch, you need a hole punch chisel. I prefer around 4-prong chisels because they are easy to use but to each their own. For me, more than four is difficult to get holes in the leather, and less takes too much time.
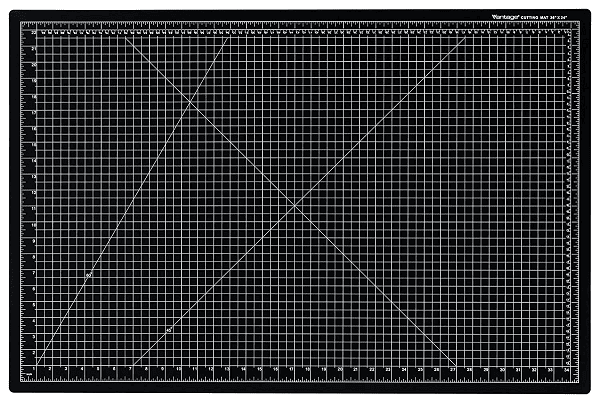
Work Surface
I cannot stress this enough but invest in a work surface. Ideally, you can get a self-healing mat, which is still the biggest upgrade I’ve ever gotten. Wood surfaces can work, but a mat is significantly better and inexpensive.
Extra Products To Get Next

Image by Emily Medlock
This is a full list of the types of products I recommend for leathercrafting (not including the necessary products I listed above.) It’s unlikely you will ever want anything else unless you include machines.
- Stamps – carving tools are super fun to use. But I would not start off with them because learning the basics of leatherworking is more important. You have to know how to make a bag before you learn how to tool it.
- Mallet/Maul – the terms are sometimes used interchangeably, but a maul has a coincident head, and a mallet has a perpendicular head to the handle. I use both, but starting with either is great.
- Lace – an extra item that I only use on special occasions because it can be expensive. Real leather lace does not replace thread, but it does add nice details that even a beginner can take on.
- Ruler – a ruler is a necessity for me. I purchased a metal ruler when I first started, which has never failed me.
- Patterns – start with any free pattern with a video tutorial to learn how to use them.
- Strop – perfect for sharpening your tools, saving you many headaches.
- Bevelers – to make crisp and clean edges.
- Awl – a multi-use tool that every worker uses differently.
- Slicker – usually a wooden tool you rub on edges to make them smooth.
- Dye – to color your leather.
- Hardware – buttons, rivets, and more.
- Skiver – an apple-peeler-like product to thin out sections.
- Finish – to protect leather and/or make it glossy.
- Anvil – perfect for applying hardware or holding leather down when tooling. Not to mention, it’s adorable. Search mini anvil or hobby anvil.
- Stitching Pony – makes stitching faster and more precise. This is a tool that holds your leather in place while you stitch it.
Top Leathercrafting Problems and Tips
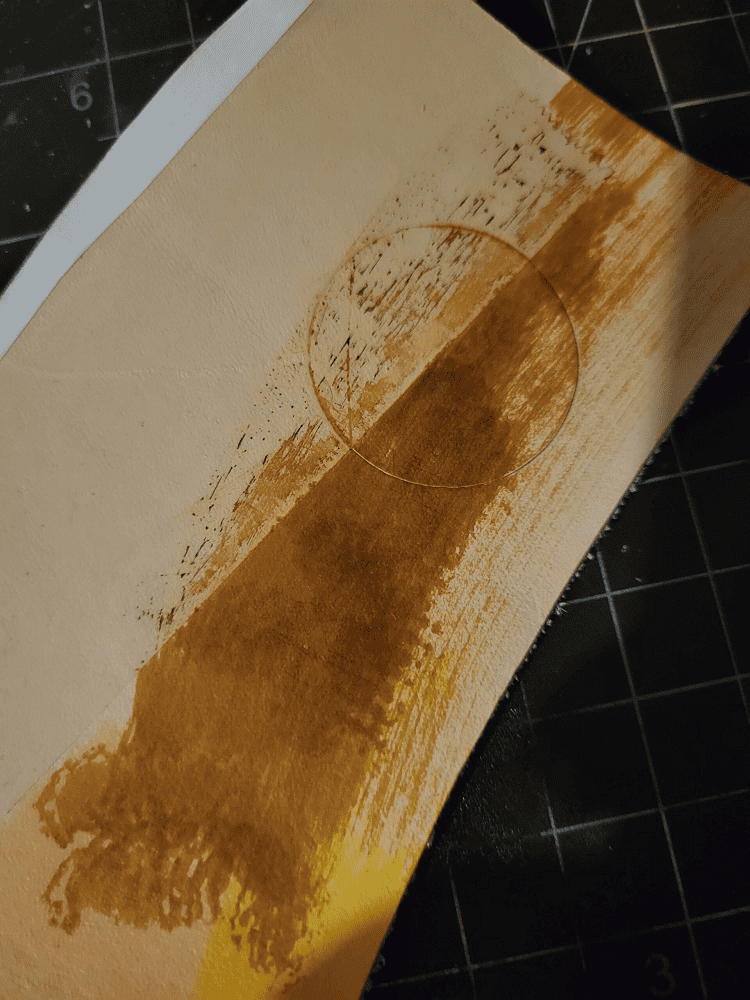
Dye job gone wrong. Image by Emily Medlock
Leathercrafting can cause headaches if you encounter problems you don’t know how to fix. But sometimes, there are also things that can prevent problems that somehow slip through the cracks when you’re learning.
The Right Type of Leather
My favorite type of leather for most projects is 4-6oz veg-tanned leather. But that all depends on what I’m making. When I made coasters, I found that thicker leather was better; when I made flowers, I found that 2-3oz was better.
Some people also prefer pre-dyed chrome-tanned leather. Veg-tanned leather patinas, is better for the environment, and looks natural. It’s also more durable. But chrome-tanned leather is naturally water-resistant, bends easily, and is more comfortable.
Uneven Dye
This is something I had to work through on my own. Dying was one of my weaknesses because I watched too many videos and tutorials, overwhelming me with information. At one point, I was putting olive oil in my water-based dye (facepalm,) making it look blotchy and all-around awful.
To this day, I don’t use deglazers (but I do clean the leather) and extra products. Instead, my favorite method is to wet the leather thoroughly with a spray bottle, wipe it with a dry rag until it appears even, then apply the dye.
Apply it first in circular motions, then either keep doing this if you like the look or finish with a straight line layer (preferably diagonally one way then the other.) I also prefer oil-based dye, but after seeing what other professionals do, this is largely based on preference.
Ventilate Your Workspace
Whenever you’re cutting and stitching leather, there’s no need to ventilate your workspace. But whenever you are dying and using finishes, it’s important to do so to prevent inhalation of toxic fumes. It’s not a bad idea to wear a mask during this time.
Messy Cuts
If your cuts are messy, the likely culprit is a dull blade. This is especially true if you did have clean cuts and now you have messy cuts. Get a strop, or make your own with a nail file and wax.
Pattern Mistakes
The best way to prevent pattern mistakes is to look over everything before you cut it more than once. Measure twice; cut once. It’s always true. If you have a video tutorial, take the time to watch the whole thing before cutting.
Slow Down
I am guilty of speeding through certain projects and always regret doing so. You will make fewer mistakes if you take your time, even during the long and boring parts of a leather project.
Wait for the Right Time
If you are tired, do not work on the project unless you have a deadline. Sometimes I feel bad about not getting anything done, but I pay for it when I work on something when I don’t want to.
Schedules are great, but find the best time for you when you are energized and feel creative. If you miss a day, try not to feel guilty about it. Everyone needs a break, even from something they enjoy.
Don’t Buy the Best Leather
At least don’t buy the best leather to start with. My first leather was leather scraps from Etsy and eBay. Some of it wasn’t even real, but it gave me a chance to start stitching and cutting.
Whenever you get used to that, then consider buying good quality leather. Get a side cut to get a chance to try out all parts of the leather without investing in a full hide, which is super expensive.
Buy Local
This isn’t a moral or economic tip but rather a practical one. When you buy online, a random cut is sent to you that you don’t get to inspect. But when you buy in-store, you get to handpick your own leather, which is invaluable.
Making Lemonade
Most pros can agree that something that makes them pro is their ability to make lemonade out of the lemon mistakes you make or someone else makes. This often happens when carving because making mistakes is so easy when the micromovements matter.
Practice Good Posture
Whether sitting at the PC or leatherworking, practicing good posture is important. This involves making it easy to have good posture while leatherworking. Get a good chair, even workspace, and look up the best sitting positions for working. Don’t be like me and spend months with new back and neck problems due to my leatherworking setup.
Wear Gloves When Dyeing
Though the dyes may not cause long-term damage, keeping them on your skin is annoying and unsafe. So make sure you wear gloves when dying your leather. Anything will work, but I prefer vinyl or nitrile.
Label Pattern Cuts
Whenever you cut out pieces for a pattern, I highly suggest labeling them, especially if the paper is labeled. If not, write what each piece will be used for on the back, or at least write a number to remind you.
My Top Leathercraft Product Recommendations
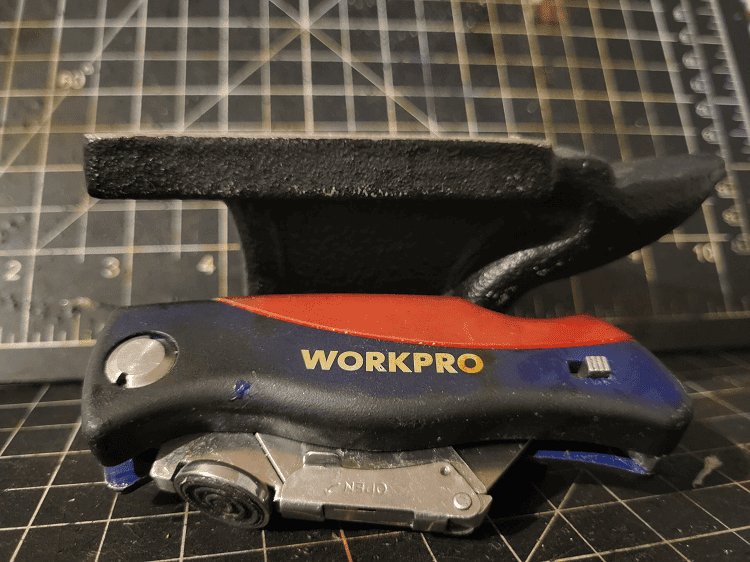
Knife and anvil. Image by Emily Medlock
I went over the types of products you need for leatherworking, but not all products are created equally. I’ve had to rebuy certain items because the ones I did buy had serious problems or broke within a week.
Some items are much less particular (for example, chisels, wood slickers, and mauls), so I see no need to list specific items for them all this time. But there are a few products that stand out, products that I’ve tested different versions of, and I cannot recommend these specific choices enough.
Starter Kit
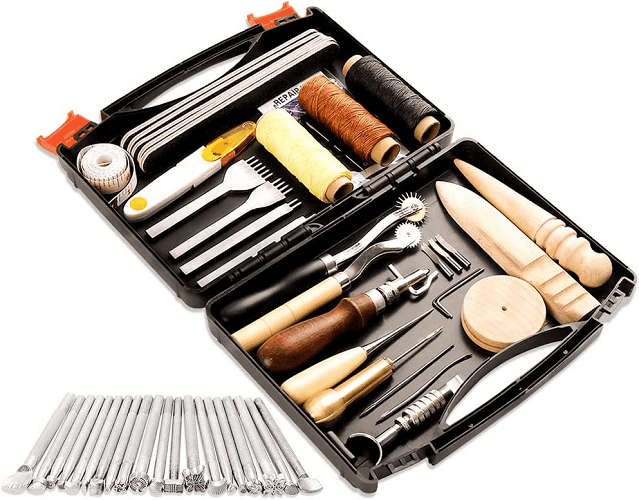
Not all starter kits are worth it, and many pros encourage you to stay away from any starter kits. But I recommend them because it’s an inexpensive way to get the basics. This is the exact kit I started with, and I still use the awl, slickers, beveler, and stamps from the set. I admit that it isn’t perfect, but it was 100% worth it for me.
WORKPRO Knife
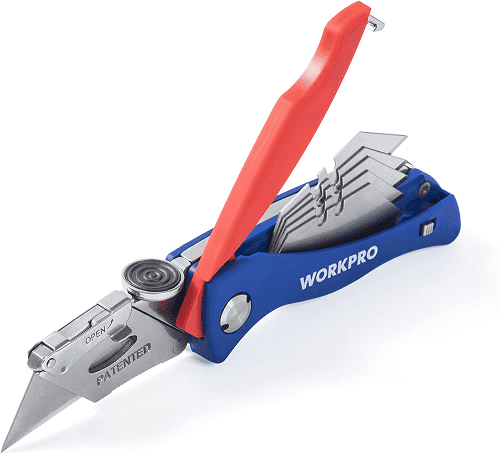
I’ve tried many utility knives (not just for leatherworking but sheetrock), and this is my favorite. While some people use exacto knives or sets specifically for leathercrafting, I much prefer a utility knife with replaceable blades.
Self-Healing Mat
I started off with a small 8×12 mat, but it didn’t get me far. When I upgraded to a 24×36 mat (this exact one), I soon realized it was worth every penny. I used it to cover almost my entire table.
Corner Cutters
Before I got corner cutters, I used a utility knife and tried my best to get a clean corner. It wasn’t easy. But this set has worked wonders, and now I have three different angled sets. The softer angles are the most universal.
Fiebing’s Resolene
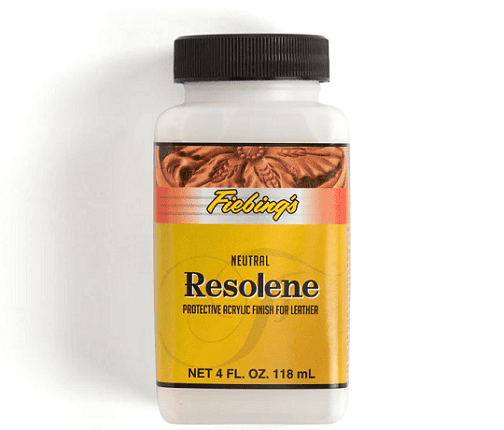
Fiebing’s has never failed me. I love their Pro Dye series more than any dye I’ve tried. But their Resolene is my favorite finish. Although Caranuba Creme protects the leather, the shine Resolene gives is unlike anything I’ve ever tried, and it’s so easy to use.
FAQs
Question: Is Leathercraft Expensive?
Answer: Yes, leatherworking is an expensive hobby. The tools aren’t expensive if you get them one at a time. But the leather is expensive, especially if you get high-end cuts without many blemishes.
Question: How Do I Start Leatherworking?
Answer: To start leatherworking, all you need is leather; that’s it. Then you can get one tool at a time, starting with a knife or carving tools if you want to primarily carve. Make sure to watch lots of tutorials and use patterns when you can.
Question: Can You Use Vegan Leather for Leathercraft?
Answer: Yes, you can. There is plastic-based leather and plant-based leather. If you use plant-based, you may need stiffener to work it properly, but plastic-based is similar to chrome-tanned leather.
Don’t Get Overwhelmed with Leatherworking
This is my number one tip for leathercrafting. There was a time when I got so overwhelmed with what there was to know and what I needed to buy that I took a break from leatherworking altogether.
When I got back to it, I had a different mindset. I worked on one project at a time, and when I took “breaks,” I practiced carving and burning. I enjoy (almost) every minute of leathercrafting, and I can’t imagine ever stopping.
Looking for more interesting readings? Check out:
Kết thúc
Ngoài các bài viết tin tức, bài báo hàng ngày của Ngọc Quang, nguồn nội dung cũng bao gồm các bài viết từ các cộng tác viên chuyên gia đầu ngành về chuỗi kiến thức thời trang được chia sẽ chủ yếu từ nhiều khía cạnh liên quan chuỗi kiến thức này. https://vietnamleather.com/ là tạp chí thời trang trẻ, xu hướng thời trang mới của giới trẻ hiện đại. Phong cách thời trang đa dạng, phong phú, phù hợp phong cách giới trẻ hiện nay. Bạn có thể dành thời gian để xem thêm các chuyên mục nội dung chính với các bài viết tư vấn, chia sẻ mới nhất, các tin tức gần đây từ chuyên gia và đối tác của Chúng tôi. Cuối cùng, với các kiến thức chia sẻ của bài viết, hy vọng góp phần nào kiến thức hỗ trợ cho độc giả tốt hơn trong hoạt động nghề nghiệp cá nhân!
* Ý kiến được trình bày trong bài viết này là của tác giả khách mời và không nhất thiết phải là Ngọc Quang. Nhân viên tác giả, cộng tác viên biên tập sẽ được liệt kê bên cuối bài viết.
Trân trọng,
Các chuyên mục nội dung liên quan